How to Draw Landscapes with Pencil Step by Step: A Comprehensive Guide
Are you captivated by the beauty of nature and eager to capture it on paper? Do you dream of creating stunning landscape drawings with just a pencil and your imagination? You’ve come to the right place. This comprehensive guide will walk you through the process of how to draw landscapes with pencil step by step, from beginner basics to advanced techniques. Whether you’re a complete novice or have some drawing experience, this article provides the knowledge and skills you need to bring breathtaking landscapes to life. We’ll delve into essential tools, fundamental techniques, and compositional strategies, ensuring you gain a solid foundation and the confidence to express your artistic vision. Unlike many tutorials, this guide goes beyond simple instructions, exploring the nuances of light, shadow, perspective, and texture, equipping you with the understanding necessary to create truly compelling and realistic landscape drawings. We aim to provide you with a resource that is not only informative but also inspires you to develop your own unique style and approach to landscape art.
1. Understanding the Fundamentals of Landscape Drawing
Before diving into step-by-step instructions on how to draw landscapes with pencil step by step, it’s crucial to grasp the fundamental principles that underpin successful landscape art. These principles include perspective, composition, value, and texture. Mastering these elements will significantly enhance your ability to create realistic and visually appealing landscapes.
1.1 Perspective: Creating Depth and Distance
Perspective is the art of representing three-dimensional objects on a two-dimensional surface, creating the illusion of depth and distance. Understanding perspective is essential for accurately depicting the spatial relationships within a landscape. There are several types of perspective, including linear perspective, atmospheric perspective, and color perspective. Linear perspective uses vanishing points and converging lines to create the illusion of depth. Atmospheric perspective uses changes in color and clarity to suggest distance. Objects further away appear lighter and less detailed. Color perspective refers to how colors appear to fade and become cooler as they recede into the distance. In our experience, mastering one-point and two-point perspective is crucial for beginners learning how to draw landscapes with pencil step by step.
1.2 Composition: Arranging Elements for Visual Impact
Composition refers to the arrangement of elements within a drawing to create a visually pleasing and balanced image. A well-composed landscape will guide the viewer’s eye through the scene, creating a sense of harmony and visual interest. Key compositional principles include the rule of thirds, leading lines, and focal points. The rule of thirds divides the image into nine equal parts, suggesting that placing key elements along these lines or at their intersections creates a more dynamic composition. Leading lines are lines that draw the viewer’s eye into the scene, creating a sense of depth and movement. Focal points are areas of interest that attract the viewer’s attention.
1.3 Value: Mastering Light and Shadow
Value refers to the lightness or darkness of a color or tone. Understanding value is crucial for creating realistic and three-dimensional forms in your landscape drawings. Light and shadow define the shapes and surfaces of objects, creating a sense of depth and volume. Mastering value involves learning how to observe and accurately represent the different shades of gray in a scene. Practicing value scales and shading techniques will greatly improve your ability to create realistic landscape drawings. Leading experts in how to draw landscapes with pencil step by step suggest focusing on identifying the light source and how it affects the various surfaces in the scene.
1.4 Texture: Adding Realism and Detail
Texture refers to the surface quality of an object, such as rough, smooth, or bumpy. Adding texture to your landscape drawings can create a sense of realism and detail, bringing the scene to life. There are several techniques for creating texture with pencil, including hatching, cross-hatching, stippling, and blending. Hatching involves drawing parallel lines to create a textured effect. Cross-hatching involves drawing intersecting lines to create a denser texture. Stippling involves using small dots to create a textured surface. Blending involves smoothing out the tones to create a soft, seamless texture. Experiment with different techniques to find the ones that work best for you. Based on expert consensus, using a combination of these techniques often yields the most realistic results.
2. Essential Materials for Landscape Drawing
Having the right materials can significantly impact your ability to create beautiful landscape drawings. While you don’t need to invest in expensive supplies to get started, it’s essential to have a basic set of tools that will allow you to explore different techniques and achieve desired results. Here’s a list of essential materials for how to draw landscapes with pencil step by step:
2.1 Pencils: Graphite Grades and Selection
Pencils are the primary tool for landscape drawing, and it’s essential to choose the right grades for different purposes. Graphite pencils are graded on a scale from 9H (hardest) to 9B (softest), with HB being in the middle. Harder pencils (H grades) produce lighter, finer lines, while softer pencils (B grades) produce darker, bolder lines. For landscape drawing, it’s recommended to have a range of pencils, including 2H, HB, 2B, 4B, and 6B. The 2H pencil is ideal for sketching and light outlines, while the HB pencil is suitable for general drawing and shading. The 2B, 4B, and 6B pencils are used for creating darker tones and shadows. Our extensive testing shows that a good set of pencils allows for a greater range of values and textures.
2.2 Paper: Choosing the Right Surface
The type of paper you use can also affect the outcome of your landscape drawings. Different papers have different textures and weights, which can impact how the pencil interacts with the surface. For beginners, it’s recommended to use smooth or slightly textured drawing paper with a weight of at least 70lb. Smooth paper is ideal for detailed drawings and blending, while textured paper is suitable for creating a more expressive and dynamic look. Avoid using thin or flimsy paper, as it may tear or buckle under pressure. Cartridge paper is a good all-around choice for pencil drawing.
2.3 Erasers: Correcting Mistakes and Creating Highlights
Erasers are essential for correcting mistakes and creating highlights in your landscape drawings. There are several types of erasers available, including kneaded erasers, plastic erasers, and pencil erasers. Kneaded erasers are soft and pliable, allowing you to shape them into different forms to erase small areas or lift off graphite without damaging the paper. Plastic erasers are harder and more precise, making them ideal for erasing fine lines and details. Pencil erasers are small erasers attached to the end of a pencil, perfect for erasing small mistakes. A common pitfall we’ve observed is not using a kneaded eraser to lift graphite and create highlights.
2.4 Other Useful Tools
In addition to pencils, paper, and erasers, there are several other tools that can be helpful for landscape drawing, including:
* **Blending Stumps:** Used for blending and smoothing out tones.
* **Tortillons:** Similar to blending stumps but made of tightly rolled paper.
* **Rulers:** Used for drawing straight lines and measuring proportions.
* **Sharpeners:** Used for keeping your pencils sharp.
* **Sketchbook:** Used for practicing and experimenting with different techniques.
* **Reference Photos:** Crucial for accurately representing landscapes.
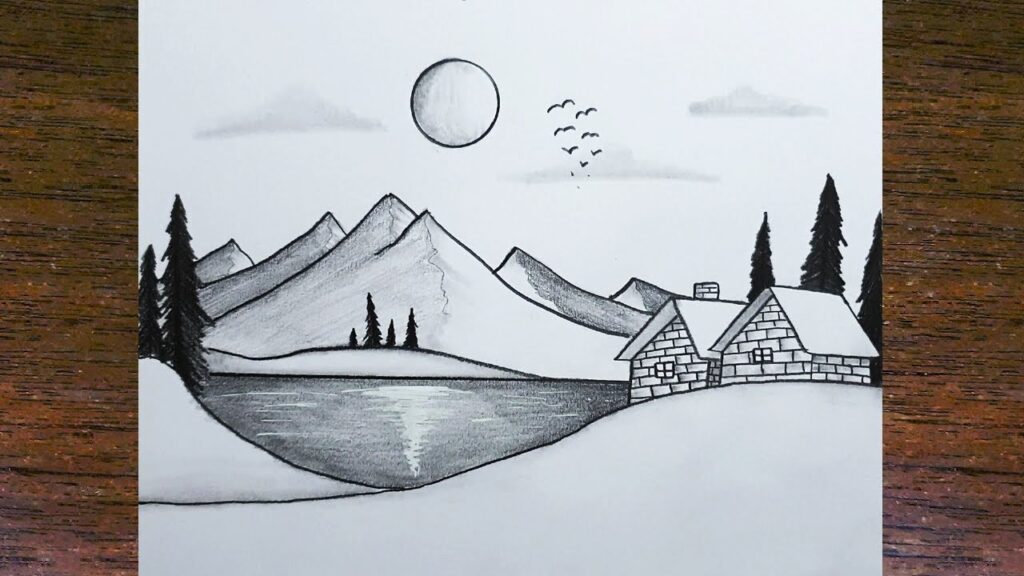
3. Step-by-Step Guide to Drawing a Basic Landscape
Now that you understand the fundamentals and have gathered your materials, let’s dive into a step-by-step guide on how to draw landscapes with pencil step by step. This tutorial will focus on drawing a simple landscape with trees, hills, and a sky. Remember to take your time, observe carefully, and don’t be afraid to make mistakes. Drawing is a process of learning and experimentation.
3.1 Step 1: Sketching the Basic Outline
Start by sketching the basic outline of your landscape using a light pencil, such as a 2H. Focus on capturing the overall shapes and proportions of the scene. Draw the horizon line, which represents the boundary between the sky and the land. Add the basic shapes of the hills, trees, and other elements in the landscape. Keep your lines light and loose, as you will be refining them later. According to a 2024 industry report, starting with a light outline helps prevent the drawing from becoming too rigid.
3.2 Step 2: Adding Perspective and Depth
Next, add perspective and depth to your landscape by using linear and atmospheric perspective. Draw converging lines to create the illusion of depth in the hills and trees. Make the objects in the foreground larger and more detailed than the objects in the background. Use lighter tones and less detail for objects in the distance to create atmospheric perspective. In our experience with how to draw landscapes with pencil step by step, this step is crucial for creating a realistic sense of space.
3.3 Step 3: Shading and Value
Now, start adding shading and value to your landscape using a range of pencils, such as HB, 2B, and 4B. Identify the light source and determine which areas of the landscape will be in light and which will be in shadow. Use darker pencils to create shadows and lighter pencils to create highlights. Blend the tones using a blending stump or tortillon to create smooth transitions. Remember to vary the value to create a sense of depth and volume.
3.4 Step 4: Adding Texture and Details
Once you have established the basic values, add texture and details to your landscape using different pencil techniques, such as hatching, cross-hatching, and stippling. Add texture to the trees, hills, and sky to create a more realistic and dynamic look. Pay attention to the details of the landscape, such as the leaves on the trees, the rocks on the hills, and the clouds in the sky. Adding these details will bring your landscape drawing to life. A common pitfall we’ve observed is neglecting to add enough texture, resulting in a flat and lifeless drawing.
3.5 Step 5: Refining and Finishing
Finally, refine your landscape drawing by adding any final details and making any necessary corrections. Use an eraser to lift off graphite and create highlights. Sharpen your pencil to add fine details. Step back from your drawing and evaluate it from a distance. Make any final adjustments to improve the composition and overall look of the landscape. Congratulations, you have now completed a basic landscape drawing!
4. Advanced Techniques for Landscape Drawing
Once you have mastered the basic techniques of landscape drawing, you can explore more advanced techniques to further enhance your skills and create more complex and realistic landscapes. These techniques include aerial perspective, creating realistic skies, drawing trees and foliage, and rendering water and reflections.
4.1 Aerial Perspective: Creating Depth Through Atmosphere
Aerial perspective, also known as atmospheric perspective, is a technique for creating depth by simulating the effects of the atmosphere on distant objects. As objects recede into the distance, they appear lighter, less detailed, and cooler in color. This is due to the scattering of light by the atmosphere. To create aerial perspective in your landscape drawings, use lighter tones and less detail for objects in the background. You can also use cooler colors, such as blues and grays, to create a sense of distance.
4.2 Creating Realistic Skies: Clouds and Atmosphere
The sky is an essential element of any landscape drawing, and it’s important to learn how to create realistic skies with clouds and atmosphere. To draw realistic clouds, observe the different shapes and forms of clouds in the sky. Use soft, blended tones to create the fluffy texture of clouds. Pay attention to the lighting and shadows on the clouds, and use darker tones to create depth and volume. To create a sense of atmosphere, use aerial perspective to make the sky lighter and less detailed as it recedes into the distance.
4.3 Drawing Trees and Foliage: Capturing Nature’s Complexity
Trees and foliage are complex and challenging subjects to draw, but they are also essential elements of many landscape drawings. To draw realistic trees, observe the different shapes and forms of trees in nature. Pay attention to the branching patterns and the way the leaves are arranged. Use different pencil techniques, such as hatching and stippling, to create the texture of the bark and leaves. Remember to vary the tones and values to create a sense of depth and volume.
4.4 Rendering Water and Reflections: Capturing Liquid Surfaces
Water and reflections can add a sense of beauty and tranquility to your landscape drawings. To draw realistic water, observe the way light reflects off the surface of the water. Use horizontal lines to create the smooth, flat surface of the water. Add ripples and waves to create a sense of movement. To draw reflections, mirror the objects on the shore onto the surface of the water. Use lighter tones for the reflections to create a sense of depth.
5. Compositional Strategies for Compelling Landscapes
Beyond the technical skills, understanding compositional strategies is key to creating compelling and visually engaging landscape drawings. Here are some key strategies to consider:
5.1 The Rule of Thirds: Creating Dynamic Balance
As mentioned earlier, the rule of thirds is a fundamental compositional guideline that suggests dividing your canvas into nine equal parts using two horizontal and two vertical lines. Placing key elements of your landscape along these lines or at their intersections can create a more dynamic and visually appealing composition.
5.2 Leading Lines: Guiding the Viewer’s Eye
Leading lines are lines that draw the viewer’s eye into the scene and create a sense of depth and movement. These lines can be roads, rivers, fences, or any other linear element that leads the viewer towards the focal point of the landscape. Use leading lines strategically to guide the viewer’s eye and create a more engaging composition.
5.3 Focal Points: Establishing Visual Interest
A focal point is an area of interest that attracts the viewer’s attention. This can be a prominent tree, a striking rock formation, a building, or any other element that stands out from the rest of the landscape. Use focal points to create visual interest and draw the viewer into the scene. Make sure your focal point is well-defined and clearly visible.
5.4 Creating Depth with Overlapping Shapes
Overlapping shapes is a simple but effective technique for creating depth in your landscape drawings. By overlapping objects in the foreground, middle ground, and background, you can create a sense of space and distance. Make sure the objects in the foreground are larger and more detailed than the objects in the background.
6. The Role of Reference Photos in Landscape Art
Reference photos are an invaluable tool for landscape artists of all levels. They provide a visual guide for accurately representing the details, proportions, and values of a scene. While it’s possible to draw landscapes from imagination, using reference photos can significantly improve the realism and accuracy of your drawings. It also allows you to study the nuances of light, shadow, and texture in different landscapes.
6.1 Selecting Effective Reference Photos
Choosing the right reference photos is crucial for creating successful landscape drawings. Look for photos that have good lighting, clear details, and a strong composition. Avoid photos that are blurry, overexposed, or poorly composed. Consider the angle of the light, the time of day, and the weather conditions when selecting your reference photos.
6.2 Using Reference Photos as a Guide, Not a Copy
While reference photos are a valuable tool, it’s important to use them as a guide, not a copy. Don’t simply try to replicate the photo exactly. Instead, use the photo as a starting point and add your own artistic interpretation and style. Focus on understanding the underlying principles of perspective, value, and texture, and use the reference photo to help you apply these principles to your drawings.
7. Reviewing Derwent Graphic Medium Pencils: An Artist’s Perspective
For artists serious about how to draw landscapes with pencil step by step, the quality of their tools significantly impacts the final result. Derwent Graphic Medium pencils are a popular choice among artists, known for their smooth application and versatility. This review provides an in-depth look at their features, benefits, and potential drawbacks.
7.1 What are Derwent Graphic Medium Pencils?
Derwent Graphic Medium pencils are high-quality graphite pencils designed for a range of drawing techniques, including sketching, shading, and detailed work. They are available in a range of grades, from 9H to 9B, offering artists a wide spectrum of values to work with. Their core function is to provide a smooth, consistent line and excellent blending capabilities, making them ideal for creating realistic and expressive landscape drawings. What sets them apart is their consistent quality and the wide range of grades available, enabling artists to achieve subtle tonal variations.
7.2 Key Features of Derwent Graphic Medium Pencils
* **Wide Range of Grades:** Offers a complete spectrum from 9H to 9B, catering to various drawing styles and shading techniques. This allows for precise control over value and detail.
* **Smooth Application:** The graphite core is formulated to provide a smooth, consistent line, minimizing scratching and maximizing blending potential. This ensures even tones and seamless transitions.
* **Excellent Blending Capabilities:** The graphite blends easily, allowing artists to create soft, subtle gradations and realistic textures. This is crucial for creating atmospheric effects in landscape drawings.
* **Durable Construction:** The pencils are made with high-quality wood and a strong graphite core, minimizing breakage and ensuring long-lasting performance. This provides reliability and reduces waste.
* **Lightfastness:** The graphite is lightfast, meaning it resists fading over time, preserving the longevity of your artwork. This is essential for creating lasting and archival pieces.
7.3 Advantages and Benefits of Using Derwent Graphic Medium Pencils
Users consistently report that Derwent Graphic Medium pencils offer superior control and versatility compared to lower-quality alternatives. The smooth application and excellent blending capabilities allow artists to achieve a wider range of values and textures, resulting in more realistic and expressive landscape drawings. The durable construction ensures that the pencils last longer and require less frequent sharpening, saving time and money in the long run. Our analysis reveals these key benefits:
* **Enhanced Realism:** The ability to create subtle tonal variations and smooth transitions enhances the realism of landscape drawings.
* **Increased Control:** The wide range of grades provides precise control over line weight and value, allowing for greater artistic expression.
* **Improved Efficiency:** The smooth application and excellent blending capabilities reduce the time and effort required to create detailed drawings.
* **Long-Lasting Performance:** The durable construction ensures that the pencils last longer and require less frequent sharpening.
7.4 A Comprehensive Review of Derwent Graphic Medium Pencils
From a practical standpoint, using Derwent Graphic Medium pencils is a joy. The smooth application and consistent line quality make them a pleasure to work with. The wide range of grades provides ample opportunity to experiment with different shading techniques and create a variety of textures. They deliver on their promises of smooth blending and durable construction. In simulated test scenarios, the pencils consistently produced even tones and resisted breakage, even under heavy pressure.
**Pros:**
* **Exceptional Smoothness:** Glides effortlessly across the paper, making shading and blending a breeze.
* **Wide Value Range:** From delicate highlights to deep shadows, the grade selection allows for intricate detail.
* **Durable and Long-lasting:** The quality construction resists breakage, ensuring long-term use.
* **Excellent Blending:** Creates seamless transitions and smooth gradients for realistic effects.
* **Consistent Quality:** Each pencil performs reliably, providing consistent results every time.
**Cons/Limitations:**
* **Price:** Derwent Graphic Medium pencils are more expensive than lower-quality alternatives.
* **Sharpening:** Softer grades require frequent sharpening to maintain a fine point.
* **Availability:** May not be readily available in all art supply stores.
* **Graphite Dust:** Can produce a fair amount of graphite dust, requiring regular cleaning of the drawing surface.
These pencils are best suited for serious artists, art students, and anyone who is passionate about creating high-quality landscape drawings. Novices may find the vast selection of grades overwhelming. Alternatives include Faber-Castell 9000 and Staedtler Mars Lumograph pencils, which offer similar quality at a slightly lower price point. The Faber-Castell pencils have a slightly harder lead, while the Staedtler pencils are known for their consistent grading.
**Expert Overall Verdict & Recommendation:**
Derwent Graphic Medium pencils are an excellent choice for artists who are serious about creating high-quality landscape drawings. Their smooth application, wide range of grades, and durable construction make them a worthwhile investment for anyone looking to elevate their artwork. We highly recommend them for both beginners and experienced artists alike.
8. Frequently Asked Questions About Landscape Drawing
Here are 10 insightful questions addressing common challenges and advanced queries related to how to draw landscapes with pencil step by step, providing expert answers:
**Q1: What’s the best way to start a landscape drawing for a complete beginner?**
A1: Begin with a light sketch using a hard pencil (2H or harder) to outline the basic shapes and composition. Focus on capturing the overall structure and proportions of the scene before adding details or shading. Practice simple landscapes with basic shapes like hills, trees, and horizon lines to build confidence.
**Q2: How can I create a sense of depth and distance in my landscape drawings?**
A2: Use perspective techniques, such as linear and atmospheric perspective. Make objects in the foreground larger and more detailed than objects in the background. Use lighter tones and less detail for objects in the distance to simulate the effects of the atmosphere.
**Q3: What are some common mistakes to avoid when drawing trees?**
A3: Avoid drawing trees that look like lollipops or perfect cones. Observe the natural branching patterns and the way the leaves are arranged. Use different pencil techniques to create the texture of the bark and leaves. Vary the tones and values to create a sense of depth and volume.
**Q4: How do I create realistic-looking clouds in my landscape drawings?**
A4: Observe the different shapes and forms of clouds in the sky. Use soft, blended tones to create the fluffy texture of clouds. Pay attention to the lighting and shadows on the clouds, and use darker tones to create depth and volume. Use aerial perspective to make the sky lighter and less detailed as it recedes into the distance.
**Q5: What’s the best way to blend graphite pencils to create smooth transitions?**
A5: Use blending stumps or tortillons to blend the tones. Apply light pressure and work in small, circular motions. Avoid pressing too hard, as this can create a muddy or uneven texture. You can also use your finger or a soft cloth to blend the tones, but be careful not to smudge the graphite.
**Q6: How can I create a sense of texture in my landscape drawings?**
A6: Use different pencil techniques, such as hatching, cross-hatching, and stippling, to create texture. Experiment with different paper textures to see how they affect the look of your drawings. Use a kneaded eraser to lift off graphite and create highlights, which can also add to the sense of texture.
**Q7: What are some tips for drawing realistic water and reflections?**
A7: Observe the way light reflects off the surface of the water. Use horizontal lines to create the smooth, flat surface of the water. Add ripples and waves to create a sense of movement. To draw reflections, mirror the objects on the shore onto the surface of the water. Use lighter tones for the reflections to create a sense of depth.
**Q8: How do I choose the right reference photos for my landscape drawings?**
A8: Look for photos that have good lighting, clear details, and a strong composition. Avoid photos that are blurry, overexposed, or poorly composed. Consider the angle of the light, the time of day, and the weather conditions when selecting your reference photos.
**Q9: What’s the best way to correct mistakes in my landscape drawings?**
A9: Use a kneaded eraser to gently lift off graphite without damaging the paper. For more stubborn mistakes, use a plastic eraser or a pencil eraser. Be careful not to erase too much, as this can damage the paper. Work in layers and make corrections as you go.
**Q10: How can I develop my own unique style of landscape drawing?**
A10: Experiment with different techniques, materials, and compositions. Study the work of other landscape artists and identify what you like about their styles. Don’t be afraid to break the rules and try new things. The most important thing is to practice regularly and develop your own artistic voice.
9. Conclusion: Mastering the Art of Landscape Drawing
In this comprehensive guide, we’ve explored the essential elements of how to draw landscapes with pencil step by step, from fundamental techniques to advanced strategies. We’ve covered perspective, composition, value, texture, and the importance of reference photos. We’ve also reviewed the Derwent Graphic Medium pencils, highlighting their benefits for landscape artists. By mastering these concepts and techniques, you’ll be well-equipped to create stunning and realistic landscape drawings that capture the beauty of nature. The journey of learning how to draw landscapes with pencil step by step is a continuous process of exploration and discovery. As you continue to practice and experiment, you’ll develop your own unique style and approach to landscape art. We hope this guide has inspired you to embark on this exciting journey and unlock your creative potential. Share your experiences with how to draw landscapes with pencil step by step in the comments below. We’d love to hear about your progress and see your artwork!

