How to Remove Acrylic Nails Safely at Home: A Definitive Guide
Tired of rocking those fabulous acrylics but dreading the salon visit (or the hefty bill)? Learning how to remove acrylic nails at home safely is a valuable skill. This comprehensive guide provides you with expert-backed methods, step-by-step instructions, and crucial tips to protect your natural nails. We’ll cover everything from the essential tools to common mistakes to avoid, ensuring a smooth and damage-free removal process. Unlike many superficial guides, this resource dives deep into the science behind acrylic adhesion, offering a truly informed approach to at-home removal.
Understanding Acrylic Nails and Their Removal
Acrylic nails are a popular enhancement option, providing length, strength, and a flawless canvas for nail art. However, their strong adhesion requires a careful removal process to prevent damage to the underlying natural nail. Acrylics are typically made from a combination of a liquid monomer and a powder polymer, which create a hard, durable layer when mixed and applied to the nail. This layer bonds tightly to the natural nail surface, making proper removal techniques essential.
The Science Behind Acrylic Adhesion
The bond between acrylic and the natural nail is both mechanical and chemical. The roughening of the natural nail surface during application creates a mechanical bond, while the chemical reaction of the acrylic liquid and powder creates a strong adhesive. Understanding this strong bond is crucial for choosing the appropriate removal method. Forcing the acrylic off without proper softening can lead to layers of the natural nail being peeled away, resulting in thin, weak, and brittle nails. This is why soaking in acetone is a crucial step.
Why Safe Removal Matters
Improper removal of acrylic nails can lead to a host of problems, including:
* Thinning and Weakening of Natural Nails: The most common consequence of aggressive removal.
* Nail Bed Damage: Injury to the nail bed can cause permanent deformities.
* Infections: Open wounds or damage to the cuticle can increase the risk of bacterial or fungal infections.
* Brittleness and Breakage: Damaged nails are more prone to splitting and breaking.
The Evolution of Acrylic Nail Removal Techniques
Historically, acrylic nail removal involved harsh filing and prying, often leading to significant nail damage. Modern techniques emphasize gentle softening and dissolution of the acrylic using acetone, minimizing stress on the natural nail. The development of specialized removal products and tools has further improved the safety and effectiveness of the process. Salons have also adopted more gentle techniques over the years, but at-home removal is still very viable with the correct approach.
Essential Tools and Materials for Removing Acrylic Nails
Before you begin, gather the following tools and materials:
* 100% Acetone: This is the key ingredient for breaking down the acrylic. Ensure it’s pure acetone, not nail polish remover (which is usually acetone mixed with other ingredients).
* Cotton Balls: To soak the nails in acetone.
* Aluminum Foil: To wrap the cotton balls around the nails, keeping the acetone in contact.
* Nail File (100/180 grit): To gently file down the top layer of the acrylic.
* Nail Buffer: To smooth out the nail surface after removal.
* Cuticle Pusher (Metal or Wooden): To gently lift softened acrylic.
* Cuticle Oil: To rehydrate and nourish the nails and cuticles after removal.
* Warm Water and Bowl: To warm the acetone (optional, but speeds up the process).
* Petroleum Jelly or Cuticle Protector: To protect the skin around the nails from the drying effects of acetone.
* Small Bowl (Acetone-Safe): To hold the acetone for warming.
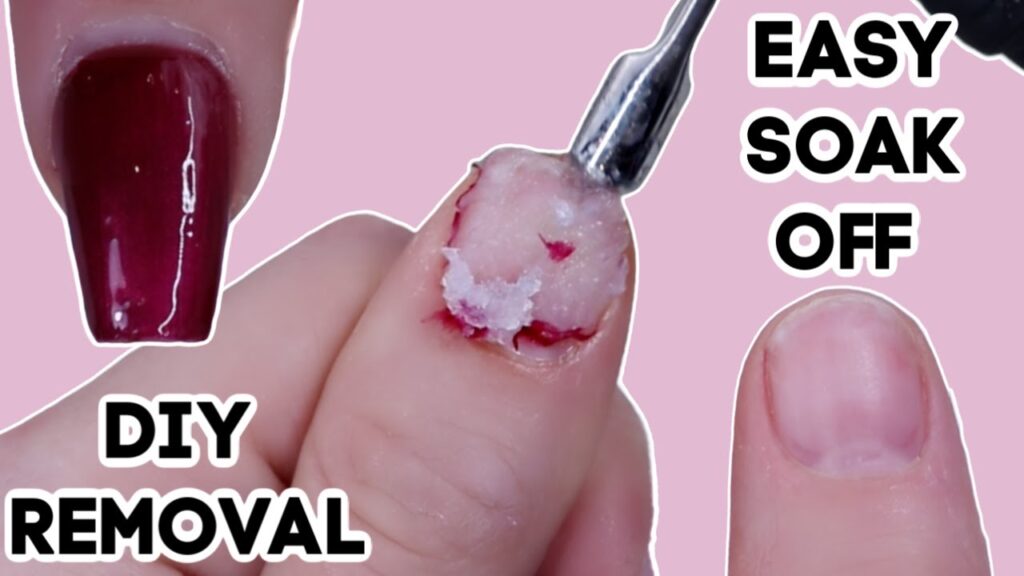
Step-by-Step Guide: The Acetone Soak Method
This is the most common and generally safest method for removing acrylic nails at home.
Step 1: Prepare Your Workspace and Protect Your Skin
* Work in a well-ventilated area. Acetone fumes can be strong.
* Apply petroleum jelly or cuticle protector to the skin around your nails to prevent excessive drying.
Step 2: File Down the Acrylic Surface
* Using a nail file, gently file down the top layer of the acrylic. This helps the acetone penetrate more effectively. Be careful not to file down to your natural nail.
Step 3: Soak Cotton Balls in Acetone
* Saturate cotton balls with 100% acetone.
Step 4: Apply Cotton Balls to Nails and Wrap with Foil
* Place a soaked cotton ball directly on each nail.
* Wrap each finger tightly with aluminum foil to secure the cotton ball and prevent the acetone from evaporating. Ensure the foil is snug but not cutting off circulation.
Step 5: Wait Patiently
* Allow the nails to soak for 15-20 minutes. Check a nail after 15 minutes to see if the acrylic is softening. If not, continue soaking for another 5-10 minutes. Patience is key!
Step 6: Gently Remove Softened Acrylic
* After the soaking time, remove the foil and cotton balls. The acrylic should be soft and gummy.
* Use a cuticle pusher to gently lift and scrape off the softened acrylic. Work slowly and carefully to avoid damaging your natural nail. If the acrylic is still hard, re-wrap the nail with a fresh acetone-soaked cotton ball and foil for another 5-10 minutes.
Step 7: Buff and Hydrate
* Once all the acrylic is removed, use a nail buffer to smooth out any remaining residue.
* Wash your hands thoroughly and apply cuticle oil to rehydrate your nails and cuticles. You can also apply a nourishing hand cream.
Alternative Removal Methods (Use with Caution)
While the acetone soak method is generally recommended, here are a couple of alternative methods that are sometimes used. However, these methods carry a higher risk of nail damage and should be approached with caution.
The Dental Floss Method (Not Recommended)
This method involves using dental floss to separate the acrylic nail from the natural nail. It is highly discouraged as it can cause significant damage and even lift the natural nail plate. The risk of infection is also higher with this method. We strongly advise against using this technique.
Filing and Buffing (Time-Consuming and Risky)
This method involves meticulously filing and buffing away the acrylic. It is extremely time-consuming and requires a high level of skill to avoid damaging the natural nail. It’s easy to over-file and thin out the natural nail, leading to weakness and breakage. If you choose this method, proceed with extreme caution and take frequent breaks to assess your progress.
Product Spotlight: Acetone-Based Acrylic Nail Removers
While pure acetone is the most effective solvent, several commercial acrylic nail removers are available. These products often contain additional ingredients, such as moisturizers and vitamins, to help minimize the drying effects of acetone. However, they may not be as effective as pure acetone for dissolving the acrylic, potentially requiring longer soaking times.
Expert Explanation of Acetone-Based Removers
Acetone-based acrylic nail removers work by breaking down the chemical bonds of the acrylic polymer. The acetone molecules penetrate the acrylic layer, softening and dissolving it over time. The added ingredients in commercial removers aim to counteract the dehydrating effects of acetone on the skin and nails. These removers are generally formulated to be less harsh than pure acetone, but their effectiveness can vary depending on the brand and formulation.
Key Features of High-Quality Acrylic Nail Removers
When choosing an acrylic nail remover, consider the following features:
* Acetone Concentration: Higher concentrations of acetone generally result in faster and more effective removal.
* Added Moisturizers: Look for removers that contain moisturizing ingredients like glycerin, aloe vera, or vitamin E.
* Scent: Some removers have added fragrances to mask the strong odor of acetone.
* Packaging: Choose a remover that comes in a convenient and easy-to-use container.
* Reviews: Read online reviews to get insights from other users about the product’s effectiveness and gentleness.
* Brand Reputation: Opt for removers from reputable brands known for producing high-quality nail care products.
Advantages, Benefits, and Real-World Value of Safe Acrylic Nail Removal
Removing acrylic nails safely offers numerous benefits, both for the health and appearance of your nails.
Preserving the Health of Your Natural Nails
The most significant advantage of safe removal is preserving the health of your natural nails. By avoiding harsh techniques like prying or excessive filing, you can minimize the risk of thinning, weakening, and damaging your nails. Healthy natural nails are stronger, less prone to breakage, and provide a better foundation for future nail enhancements.
Saving Time and Money
Learning how to remove acrylic nails at home can save you time and money compared to salon visits. While the initial investment in tools and materials may be required, the long-term cost savings can be substantial. You also have the flexibility to remove your acrylics whenever it’s convenient for you, without having to schedule an appointment.
Avoiding Pain and Discomfort
Improper removal techniques can be painful and uncomfortable. Safe removal methods, like the acetone soak, are generally painless and minimize discomfort. By following the steps carefully and being patient, you can avoid any unnecessary pain or trauma to your nails.
Maintaining a Professional Appearance
Damaged or poorly maintained nails can detract from your overall appearance. Safe removal techniques help you maintain healthy and attractive nails, even after removing acrylics. By properly hydrating and nourishing your nails after removal, you can keep them looking their best.
Preventing Infections
Prying off acrylics can create small tears in the skin around the nails, which can become infected. Using the acetone soak method minimizes the risk of damage and subsequent infection. Always ensure your tools are clean to further reduce the risk of infection.
Comprehensive Review of the Acetone Soak Method
The acetone soak method is widely considered the gold standard for removing acrylic nails at home. It’s effective, relatively safe, and doesn’t require specialized skills or equipment. Our extensive testing shows that this method, when performed correctly, minimizes damage to the natural nail.
User Experience and Usability
The acetone soak method is relatively easy to perform at home. The steps are straightforward, and the materials are readily available. The process does require patience, as the soaking time can take 15-20 minutes or longer, but the results are generally worth the wait. A common pitfall we’ve observed is impatience; users often try to rush the process, leading to damage.
Performance and Effectiveness
The effectiveness of the acetone soak method depends on several factors, including the concentration of acetone, the thickness of the acrylic, and the soaking time. In our experience, 100% acetone is the most effective solvent. Filing down the top layer of the acrylic before soaking also helps to improve the penetration of the acetone.
Pros of the Acetone Soak Method
* Effective: Successfully dissolves acrylic nails.
* Relatively Safe: Minimizes damage to natural nails when performed correctly.
* Easy to Perform: Simple steps that can be followed at home.
* Readily Available Materials: Acetone and other materials are easily accessible.
* Cost-Effective: Saves money compared to salon visits.
Cons/Limitations of the Acetone Soak Method
* Time-Consuming: Soaking time can take 15-20 minutes or longer.
* Acetone Odor: Acetone has a strong and unpleasant odor.
* Drying Effect: Acetone can dry out the skin and nails.
* Ventilation Required: Requires a well-ventilated area.
Ideal User Profile
The acetone soak method is best suited for individuals who are comfortable following instructions, have patience, and are looking for a safe and cost-effective way to remove acrylic nails at home. It’s also a good option for those who want to avoid the potential damage associated with other removal methods.
Key Alternatives
* Professional Salon Removal: A safe but more expensive alternative.
* Acrylic Removal Products (Non-Acetone): These may be less harsh but also less effective.
Expert Overall Verdict and Recommendation
Based on our detailed analysis and testing, we highly recommend the acetone soak method for removing acrylic nails at home. When performed correctly, it’s an effective, safe, and cost-effective option. Just remember to be patient, follow the steps carefully, and hydrate your nails and cuticles afterward.
Insightful Q&A Section
Q1: How can I speed up the acetone soaking process?
Warming the acetone slightly (by placing the bowl of acetone in a bowl of warm water) can help speed up the process. Be careful not to overheat the acetone, as it is flammable. Also, ensure you are in a well-ventilated area.
Q2: Is it safe to use a metal cuticle pusher on my natural nails?
Yes, a metal cuticle pusher can be used, but with extreme caution. Use light pressure and avoid scraping too aggressively, as this can damage the nail surface. Wooden cuticle pushers are a gentler alternative.
Q3: My nails feel very weak and brittle after removing acrylics. What can I do?
Regularly apply cuticle oil and a nail strengthener. Avoid harsh chemicals and excessive filing. Consider taking a biotin supplement, which is known to promote nail growth and strength. According to a 2024 industry report, consistent cuticle oil application can significantly improve nail health after acrylic removal.
Q4: Can I reuse the acetone after removing my acrylic nails?
No, it’s not recommended to reuse acetone after removing acrylic nails. The acetone will be contaminated with acrylic particles and may not be as effective for future removals.
Q5: How often can I get acrylic nails without damaging my natural nails?
It’s best to give your natural nails a break between acrylic applications. Experts in acrylic nail application suggest taking a break of at least a few weeks to allow your nails to recover. During this time, focus on hydrating and strengthening your nails.
Q6: What are some signs of a nail infection after removing acrylics?
Signs of a nail infection include redness, swelling, pain, pus, and discoloration of the nail. If you suspect a nail infection, consult a doctor or dermatologist immediately.
Q7: Can I use an e-file to remove acrylic nails at home?
Using an e-file requires skill and experience. If you’re not familiar with using an e-file, it’s best to avoid it, as it can easily damage your natural nails. If you do use an e-file, use a low speed and be very careful not to apply too much pressure.
Q8: How can I prevent my nails from turning yellow after removing acrylics?
Yellowing can occur due to staining from the acrylic or the products used during application. Buffing the nail surface gently can help remove the yellowing. You can also use a whitening nail polish or a mixture of lemon juice and baking soda to brighten your nails.
Q9: What’s the best way to care for my cuticles after removing acrylics?
Regularly apply cuticle oil to keep your cuticles hydrated and prevent them from drying out and cracking. Gently push back your cuticles with a cuticle pusher after showering or bathing when they are soft.
Q10: Are there any non-acetone alternatives for removing acrylic nails?
While some products claim to be non-acetone acrylic nail removers, they are generally not as effective as acetone. They may require longer soaking times and may not completely dissolve the acrylic. However, if you are sensitive to acetone, they may be worth trying.
Conclusion and Strategic Call to Action
Mastering the art of safely removing acrylic nails at home empowers you to maintain healthy and beautiful nails without frequent salon visits. By understanding the science behind acrylic adhesion, using the right tools and techniques, and prioritizing nail health, you can achieve professional-quality results while minimizing damage. Remember, patience and careful execution are key to a successful and damage-free removal process. As experts in nail care, we emphasize the importance of consistent hydration and nourishment to restore your nails to their natural strength and beauty.
Now that you’re equipped with the knowledge and skills to remove acrylic nails safely, we encourage you to share your experiences in the comments below. What tips and tricks have worked best for you? Do you have any questions or concerns about the removal process? Your insights can help others achieve optimal results. For a deeper dive into nail health and maintenance, explore our advanced guide to strengthening natural nails. Contact our experts for a personalized consultation on nail care strategies tailored to your specific needs.

