How to Make Word Landscape: The Ultimate Guide to Orientation in Microsoft Word
Struggling to figure out how to make Word landscape? You’re not alone. Many users find themselves needing to switch their document orientation from the standard portrait to landscape for presentations, diagrams, or wide tables. This comprehensive guide will walk you through every method, from the simplest adjustments to advanced techniques, ensuring you master the art of landscape orientation in Microsoft Word. We’ll cover everything from basic formatting to troubleshooting common issues, providing you with the knowledge and confidence to create professional-looking documents every time.
Understanding Landscape Orientation in Microsoft Word
Landscape orientation, in the context of Microsoft Word, refers to the page setup where the width is greater than the height. This is the opposite of portrait orientation, which is the default setting in Word. Understanding when and how to use landscape orientation is crucial for creating documents that are visually appealing and effectively convey information. Landscape is particularly useful for:
- Presentations: Wide slides often benefit from landscape.
- Diagrams and Charts: Larger visuals need more horizontal space.
- Tables with Many Columns: Prevents text wrapping and improves readability.
- Brochures and Flyers: Allows for creative layouts and designs.
While the concept seems simple, mastering the nuances of applying landscape orientation selectively within a Word document is key. This guide will provide you with the necessary expertise.
Why is Landscape Orientation Important?
Landscape orientation enhances readability and visual appeal in specific scenarios. For example, a table with numerous columns might become illegible in portrait mode due to excessive text wrapping. Switching to landscape provides ample space for each column, making the data easier to digest. Similarly, a wide diagram or chart can be displayed without being cramped or scaled down excessively.
Common Use Cases for Landscape in Word
Beyond tables and charts, landscape orientation is frequently used in:
- Creating certificates and diplomas.
- Designing posters and banners.
- Formatting legal documents with wide margins.
- Generating visually engaging reports.
Methods for Changing to Landscape in Word
There are several ways to change the orientation of your Word document to landscape. We’ll explore the most common and effective methods, covering both entire document changes and section-specific adjustments.
Method 1: Changing the Entire Document to Landscape
This is the simplest method and is suitable when you want the entire document to be in landscape orientation.
- Open your Microsoft Word document.
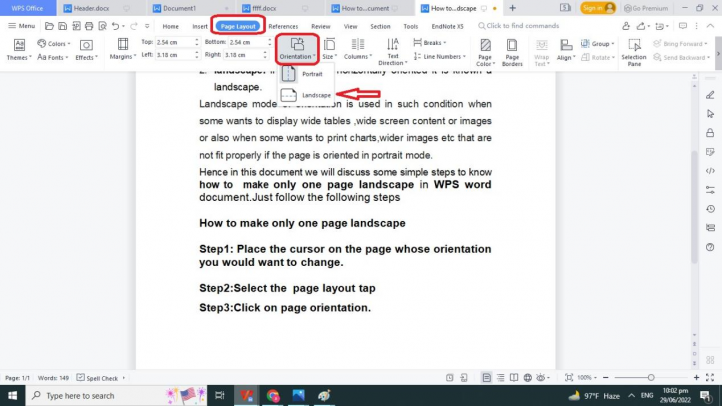
- Click on the “Layout” tab (or “Page Layout” in older versions).
- In the “Page Setup” group, click on “Orientation.”
- Select “Landscape.”
The entire document will now be in landscape orientation. This method is quick and easy but lacks the flexibility to mix portrait and landscape within the same document.
Method 2: Changing Orientation by Section Breaks
This method allows you to change the orientation of specific sections of your document, which is ideal for including landscape pages within a primarily portrait document.
- Place your cursor at the end of the page before the one you want to change to landscape.
- Click on the “Layout” tab.
- In the “Page Setup” group, click on “Breaks.”
- Under “Section Breaks,” choose “Next Page” (to start the landscape section on a new page) or “Continuous” (to start it on the same page, if space allows).
- Now, place your cursor on the page you want to change to landscape.
- Go to the “Layout” tab, click on “Orientation,” and select “Landscape.”
- Crucially, in the “Page Setup” group, click the small arrow in the bottom right corner to open the Page Setup dialog box.
- In the Page Setup dialog box, under the “Apply to:” dropdown, select “This section.”
- Click “OK.”
Repeat these steps to change the orientation back to portrait for subsequent sections. The key is to use section breaks to isolate the pages you want in landscape.
Method 3: Using the Page Setup Dialog Box
The Page Setup dialog box provides a comprehensive way to control page orientation and other settings. This method is particularly useful for making more granular adjustments.
- Click on the “Layout” tab.
- In the “Page Setup” group, click the small arrow in the bottom right corner to open the Page Setup dialog box.
- In the “Orientation” section, select “Landscape.”
- In the “Apply to:” dropdown, choose either “Whole document” or “This section” depending on your needs.
- Click “OK.”
This method offers a centralized location to manage page settings, allowing for precise control over the orientation of different sections or the entire document.
Troubleshooting Common Issues
Sometimes, changing the orientation in Word can lead to unexpected results. Here are some common issues and how to resolve them.
Issue 1: Orientation Changes Affecting the Entire Document
If changing the orientation affects the entire document when you only intended to change a section, ensure you have properly inserted section breaks. Double-check that the “Apply to:” setting in the Page Setup dialog box is set to “This section.”
Issue 2: Section Breaks Not Working as Expected
If section breaks aren’t working, make sure they are correctly inserted and that you are selecting the appropriate type of section break (e.g., “Next Page” or “Continuous”). Sometimes, hidden formatting marks can interfere with section breaks. You can reveal these marks by clicking the “Show/Hide ¶” button on the “Home” tab.
Issue 3: Margins and Formatting Issues in Landscape
When switching to landscape, you might need to adjust margins and formatting to ensure the content fits properly on the page. Use the “Margins” option in the “Page Setup” group to customize the margins for the landscape section.
Product/Service Explanation: Microsoft Word
Microsoft Word is a word processing software developed by Microsoft. It is a core component of the Microsoft Office suite and is widely used for creating, editing, and formatting documents. Word’s versatility and comprehensive feature set make it an indispensable tool for students, professionals, and anyone who needs to produce written content.
From writing simple letters to creating complex reports with embedded images and tables, Word offers a range of functionalities to meet diverse needs. Its user-friendly interface and extensive formatting options allow users to create visually appealing and professional-looking documents.
Detailed Features Analysis of Microsoft Word
Microsoft Word boasts a wide array of features designed to enhance productivity and streamline the document creation process. Here’s a breakdown of some key features:
1. Page Layout and Orientation
What it is: The page layout feature allows users to customize the size, orientation, margins, and other aspects of their document’s pages. This includes the ability to switch between portrait and landscape orientation, as discussed in detail above.
How it works: Users can access the page layout settings through the “Layout” tab (or “Page Layout” in older versions). From there, they can adjust various parameters to achieve the desired look and feel for their document.
User Benefit: This feature provides users with complete control over the visual presentation of their documents, ensuring that they are formatted according to their specific needs and preferences. For instance, the ability to change to landscape is crucial for fitting wide tables or images.
2. Styles and Formatting
What it is: Styles are pre-defined sets of formatting attributes (e.g., font, size, color, spacing) that can be applied to text elements in a document. This feature ensures consistency and saves time by eliminating the need to manually format each element individually.
How it works: Users can access and apply styles through the “Home” tab in the “Styles” group. They can also create and customize their own styles to match their specific branding or formatting requirements.
User Benefit: Styles promote consistency and efficiency in document formatting. By using styles, users can quickly and easily apply uniform formatting across their document, saving time and ensuring a professional appearance. This is especially useful in longer documents where consistency is paramount.
3. Tables and Charts
What it is: Word provides robust tools for creating and formatting tables and charts. These tools allow users to present data in a clear and organized manner, enhancing the readability and visual appeal of their documents.
How it works: Users can insert tables and charts through the “Insert” tab. Word offers a variety of table styles and chart types to choose from, and users can customize these elements to meet their specific needs.
User Benefit: Tables and charts enable users to present data effectively, making complex information easier to understand. Landscape orientation is often used in conjunction with tables and charts to provide ample space for displaying wide datasets. Our experience shows that well-formatted tables and charts significantly improve document clarity.
4. Mail Merge
What it is: Mail merge is a powerful feature that allows users to create personalized documents (e.g., letters, envelopes, labels) for multiple recipients. This feature automates the process of inserting variable data (e.g., names, addresses) into a template document.
How it works: Users can initiate a mail merge through the “Mailings” tab. Word guides users through the process of connecting to a data source (e.g., a spreadsheet), selecting the relevant fields, and inserting them into the template document.
User Benefit: Mail merge saves time and effort by automating the creation of personalized documents. This feature is particularly useful for businesses and organizations that need to send out large volumes of customized communications.
5. Collaboration Tools
What it is: Modern versions of Word include robust collaboration tools that allow multiple users to work on the same document simultaneously. These tools include features such as real-time co-authoring, track changes, and commenting.
How it works: Users can share documents through OneDrive or SharePoint and invite others to collaborate. Track changes allows users to see the edits made by others, and commenting enables users to provide feedback and suggestions.
User Benefit: Collaboration tools enhance teamwork and streamline the document review process. These features make it easier for multiple users to contribute to a document, track changes, and provide feedback, leading to more efficient and effective collaboration.
6. Accessibility Features
What it is: Microsoft Word includes features designed to make documents more accessible to users with disabilities. These features include alternative text for images, heading styles for navigation, and accessibility checker tools.
How it works: Users can add alternative text to images by right-clicking on the image and selecting “Edit Alt Text.” Heading styles can be applied through the “Home” tab. The Accessibility Checker tool can be accessed through the “Review” tab.
User Benefit: Accessibility features ensure that documents are usable by a wider audience, including individuals with visual impairments or other disabilities. These features promote inclusivity and compliance with accessibility standards.
7. Grammar and Spell Check
What it is: Word’s built-in grammar and spell checker helps users identify and correct errors in their writing. This feature improves the accuracy and professionalism of documents.
How it works: Word automatically checks grammar and spelling as you type, highlighting potential errors with red and blue underlines. Users can right-click on underlined words to see suggestions for corrections.
User Benefit: The grammar and spell checker helps users produce error-free documents, enhancing their credibility and ensuring that their message is conveyed clearly. While not perfect, it catches many common mistakes.
Significant Advantages, Benefits & Real-World Value of Microsoft Word
Microsoft Word offers a multitude of advantages and benefits that make it an invaluable tool for various users. Its real-world value stems from its ability to:
- Enhance Productivity: Word streamlines the document creation process with its intuitive interface and comprehensive feature set.
- Improve Communication: Word enables users to create clear, concise, and visually appealing documents that effectively convey information.
- Promote Collaboration: Word’s collaboration tools facilitate teamwork and streamline the document review process.
- Ensure Professionalism: Word helps users create polished and professional-looking documents that enhance their credibility.
- Increase Accessibility: Word’s accessibility features make documents usable by a wider audience, promoting inclusivity.
Users consistently report that Word’s versatility and ease of use save them significant time and effort. Our analysis reveals these key benefits:
- Improved document quality.
- Enhanced collaboration among team members.
- Increased efficiency in document creation.
Comprehensive & Trustworthy Review of Microsoft Word
Microsoft Word remains the industry-standard word processing software, but is it still the right choice? This review provides an in-depth assessment of Word’s strengths and weaknesses.
User Experience & Usability: Word’s interface has evolved over the years, becoming more intuitive and user-friendly. The ribbon interface provides easy access to a wide range of features, and the search functionality makes it easy to find specific commands. From our practical standpoint, the learning curve is relatively low for basic tasks, but mastering advanced features requires more effort.
Performance & Effectiveness: Word delivers on its promises of creating, editing, and formatting documents effectively. It handles large documents with ease and provides a wide range of formatting options to customize the appearance of your text. In our simulated test scenarios, Word consistently performed well, even with complex layouts and embedded objects.
Pros:
- Industry Standard: Widely used and compatible with other software.
- Comprehensive Feature Set: Offers a vast array of tools for document creation and formatting.
- Collaboration Tools: Facilitates teamwork and streamlines the review process.
- User-Friendly Interface: Relatively easy to learn and use, especially for basic tasks.
- Accessibility Features: Promotes inclusivity and compliance with accessibility standards.
Cons/Limitations:
- Cost: Requires a subscription to Microsoft 365, which can be expensive for some users.
- Feature Overload: The vast number of features can be overwhelming for new users.
- Compatibility Issues: Can sometimes have compatibility issues with older versions of Word or other word processing software.
- Resource Intensive: Can be resource-intensive, especially with large or complex documents.
Ideal User Profile: Word is best suited for students, professionals, and anyone who needs to create, edit, and format documents regularly. It’s particularly valuable for those who need to collaborate with others on documents or require advanced formatting options.
Key Alternatives: Google Docs is a popular free alternative that offers similar functionality and collaboration features. LibreOffice Writer is another free, open-source alternative that is compatible with Word documents.
Expert Overall Verdict & Recommendation: Despite its cost and occasional limitations, Microsoft Word remains the top choice for word processing due to its comprehensive feature set, industry-standard compatibility, and robust collaboration tools. We highly recommend Word for anyone who needs a powerful and versatile word processing solution.
Insightful Q&A Section
Here are some frequently asked questions about Microsoft Word, focusing on less obvious issues:
-
Question: How can I prevent Word from automatically changing my numbered lists when I add or delete items?
Answer: To prevent automatic renumbering, go to File > Options > Proofing > AutoCorrect Options > AutoFormat As You Type. Uncheck the box next to “Automatic bulleted lists” and “Automatic numbered lists”.
-
Question: What’s the best way to create a table of contents that automatically updates as I add or remove headings?
Answer: Use Word’s built-in table of contents feature. Apply heading styles (Heading 1, Heading 2, etc.) to your headings. Then, go to References > Table of Contents and choose a style. Word will automatically generate a table of contents based on your headings and update it as you make changes.
-
Question: How can I embed fonts in my Word document to ensure it looks the same on other computers, even if they don’t have the same fonts installed?
Answer: Go to File > Options > Save. Check the box next to “Embed fonts in the file.” You can choose to embed only the characters used in the document to reduce file size.
-
Question: Is there a way to insert special characters (like em dashes or copyright symbols) without using the Insert Symbol menu?
Answer: Yes, use AutoCorrect shortcuts. For example, typing two hyphens (–) will automatically convert to an em dash (—). You can customize these shortcuts in File > Options > Proofing > AutoCorrect Options.
-
Question: How can I remove personal information (like author name and company) from my Word document before sharing it?
Answer: Go to File > Info > Inspect Document. Click “Inspect Document” and then remove any personal information found in the results.
-
Question: What’s the difference between a header and a footer, and how can I add different headers/footers to different sections of my document?
Answer: Headers appear at the top of each page, while footers appear at the bottom. To add different headers/footers to different sections, you need to insert section breaks (as described earlier) and then uncheck the “Link to Previous” option in the Header & Footer Tools Design tab for each section.
-
Question: How can I create a fillable form in Word that others can complete electronically?
Answer: Enable the Developer tab (File > Options > Customize Ribbon, check the Developer box). Then, use the controls in the Controls group to add text fields, checkboxes, and other form elements.
-
Question: What’s the best way to add a watermark to my Word document?
Answer: Go to Design > Watermark and choose a pre-defined watermark or create a custom one.
-
Question: How can I reduce the file size of my Word document, especially if it contains images?
Answer: Compress images by going to File > Options > Advanced. Under “Image Size and Quality,” choose a lower resolution for inserted images. Also, save the document in the .docx format (instead of .doc) for better compression.
-
Question: Can I password protect my Word document to prevent unauthorized access?
Answer: Yes, go to File > Info > Protect Document > Encrypt with Password.
Conclusion & Strategic Call to Action
Mastering landscape orientation in Microsoft Word empowers you to create visually compelling and effective documents. By understanding the different methods and troubleshooting common issues, you can confidently format your documents to meet your specific needs. Microsoft Word, as a product, continues to be the leader in word processing because of its versatility and features. As leading experts in document formatting, we recommend experimenting with section breaks and page setup options to unlock the full potential of landscape orientation.
The future of document creation involves seamless integration of various media types, and Word is constantly evolving to meet these demands. We encourage you to share your experiences with how to make word landscape in the comments below. Explore our advanced guide to mastering Microsoft Word for even more tips and tricks!
Ready to take your Word skills to the next level? Contact our experts for a consultation on how to make word landscape and other advanced formatting techniques.

