## The Best Way to Cut Acrylic: A Comprehensive Guide for Professionals and Hobbyists
Are you looking for the **best way to cut acrylic** for your next project? Whether you’re a seasoned professional or a DIY enthusiast, achieving clean, precise cuts in acrylic can be challenging. This comprehensive guide provides you with expert insights, proven techniques, and essential tips to ensure flawless results every time. We’ll delve into the tools, methods, and best practices, so you can confidently tackle any acrylic cutting project.
Acrylic, also known as Plexiglas or Lucite, is a versatile material prized for its clarity, durability, and ease of fabrication. However, its tendency to chip, crack, or melt under improper cutting conditions can be frustrating. This guide is designed to eliminate that frustration and equip you with the knowledge and skills to master acrylic cutting.
Here’s what you’ll learn in this comprehensive guide:
* **Choosing the Right Tools:** From scoring knives to laser cutters, we’ll explore the best tools for different acrylic thicknesses and project requirements.
* **Mastering Cutting Techniques:** Learn proven methods for achieving clean, precise cuts using various tools, including saws, routers, and laser cutters.
* **Preventing Cracking and Chipping:** Discover essential tips and tricks to minimize the risk of damage during the cutting process.
* **Finishing and Polishing:** Learn how to smooth rough edges and achieve a professional-looking finish.
* **Safety Considerations:** Understand the necessary safety precautions to protect yourself from potential hazards.
By the end of this guide, you’ll have a thorough understanding of the **best way to cut acrylic**, regardless of your experience level. Let’s dive in!
## Understanding Acrylic: Properties and Cutting Considerations
Before we delve into the specifics of cutting techniques, it’s crucial to understand the properties of acrylic and how they affect the cutting process. Acrylic is a thermoplastic polymer known for its exceptional clarity, impact resistance, and weatherability. However, it’s also relatively soft and prone to scratching and melting under heat.
### Acrylic Types: Cast vs. Extruded
There are two main types of acrylic: cast and extruded. Cast acrylic is produced by pouring liquid acrylic into a mold and allowing it to harden. This process results in a more uniform material with better optical clarity and chemical resistance. Cast acrylic is generally preferred for applications requiring high precision and durability.
Extruded acrylic, on the other hand, is produced by continuously pushing molten acrylic through a die. This process results in a less uniform material with lower optical clarity and chemical resistance compared to cast acrylic. Extruded acrylic is typically less expensive than cast acrylic and is often used for general-purpose applications.
**Key Differences:**
* **Cast Acrylic:** Higher optical clarity, better chemical resistance, less prone to scratching, preferred for precision applications, more expensive.
* **Extruded Acrylic:** Lower optical clarity, lower chemical resistance, more prone to scratching, suitable for general-purpose applications, less expensive.
### Cutting Considerations
The type of acrylic you’re working with will influence the best cutting method. Cast acrylic, with its higher density and uniformity, is generally easier to cut cleanly and precisely. Extruded acrylic, due to its lower density and potential for internal stresses, may be more prone to chipping or cracking.
Furthermore, the thickness of the acrylic sheet will also dictate the appropriate cutting tool and technique. Thicker sheets require more powerful tools and slower cutting speeds to prevent overheating and damage.
Understanding these fundamental properties and considerations is crucial for selecting the **best way to cut acrylic** and achieving successful results.
## Essential Tools for Cutting Acrylic
Choosing the right tools is paramount for achieving clean, precise cuts in acrylic. The best tool for the job will depend on the thickness of the acrylic sheet, the complexity of the cut, and your desired level of precision. Here’s an overview of some essential tools for cutting acrylic:
### Scoring Knife
A scoring knife is a simple hand tool used to create a shallow groove on the surface of the acrylic sheet. This groove acts as a guide for breaking the acrylic along a straight line. Scoring knives are best suited for cutting thin acrylic sheets (typically up to 1/8 inch thick) and are ideal for making straight cuts.
**How to Use a Scoring Knife:**
1. Secure the acrylic sheet to a flat surface.
2. Use a straightedge to guide the scoring knife along the desired cut line.
3. Apply firm, even pressure and draw the knife along the line several times, creating a shallow groove.
4. Place the scored acrylic sheet over a sharp edge with the groove facing up.
5. Apply gentle pressure on both sides of the score line to snap the acrylic along the groove.
### Hand Saw
A hand saw, such as a fine-toothed backsaw or a coping saw, can be used to cut acrylic sheets of various thicknesses. Hand saws are particularly useful for making curved or intricate cuts that are difficult to achieve with other tools.
**Tips for Using a Hand Saw:**
* Use a fine-toothed blade specifically designed for cutting plastics.
* Apply gentle, even pressure to avoid overheating and melting the acrylic.
* Use a lubricant, such as water or mineral oil, to reduce friction and prevent the blade from binding.
* Cut slowly and steadily, following the desired cut line.
### Circular Saw
A circular saw is a powerful tool that can be used to cut thick acrylic sheets quickly and efficiently. However, it’s essential to use a blade specifically designed for cutting plastics and to take precautions to prevent chipping and cracking.
**Best Practices for Using a Circular Saw:**
* Use a triple-chip grind (TCG) blade with a high tooth count (80 or more teeth).
* Set the blade depth to just slightly more than the thickness of the acrylic sheet.
* Use a zero-clearance insert to minimize chipping and splintering.
* Feed the saw slowly and steadily, allowing the blade to do the work.
* Use a lubricant to reduce friction and prevent overheating.
### Jigsaw
A jigsaw is a versatile tool that can be used to cut curved or intricate shapes in acrylic sheets. It’s particularly useful for making cutouts or following complex patterns.
**Jigsaw Cutting Tips:**
* Use a fine-toothed blade designed for cutting plastics.
* Set the saw to a low speed to minimize heat buildup.
* Use a lubricant to reduce friction and prevent the blade from binding.
* Secure the acrylic sheet firmly to prevent it from vibrating.
* Follow the desired cut line carefully, using a guide if necessary.
### Router
A router is a powerful tool that can be used to create smooth, precise edges on acrylic sheets. It’s also useful for creating grooves, rabbets, and other decorative features.
**Router Techniques for Acrylic:**
* Use a spiral upcut bit designed for cutting plastics.
* Set the router speed to a medium setting to minimize heat buildup.
* Make multiple shallow passes instead of one deep pass to reduce the risk of chipping and cracking.
* Use a template or guide to ensure accuracy.
* Wear safety glasses and a dust mask to protect yourself from flying debris.
### Laser Cutter
A laser cutter is a sophisticated tool that uses a focused laser beam to cut acrylic sheets with extreme precision. Laser cutters are ideal for creating intricate designs, complex shapes, and fine details.
**Laser Cutter Advantages:**
* Exceptional precision and accuracy.
* Ability to cut intricate designs and fine details.
* Clean, smooth edges with minimal finishing required.
* Suitable for cutting a wide range of acrylic thicknesses.
Choosing the right tool for your specific project is a critical step in achieving the **best way to cut acrylic**.
## Mastering Cutting Techniques for Acrylic
Once you’ve selected the appropriate tool, mastering the correct cutting technique is essential for achieving clean, precise cuts in acrylic. Here are some proven techniques for cutting acrylic using various tools:
### Scoring and Snapping
This technique is best suited for cutting thin acrylic sheets (up to 1/8 inch thick) along straight lines. It involves scoring the acrylic surface with a scoring knife and then snapping it along the scored line.
**Step-by-Step Guide:**
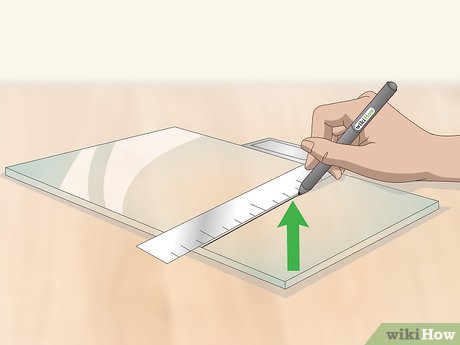
1. **Prepare the Acrylic:** Clean the acrylic sheet and mark the desired cut line with a fine-tipped marker.
2. **Score the Surface:** Use a straightedge to guide the scoring knife along the cut line. Apply firm, even pressure and draw the knife along the line several times, creating a shallow groove.
3. **Snap the Acrylic:** Place the scored acrylic sheet over a sharp edge with the groove facing up. Apply gentle, even pressure on both sides of the score line to snap the acrylic along the groove.
4. **Clean the Edges:** Use a file or sandpaper to smooth any rough edges.
### Sawing
Sawing is a versatile technique that can be used to cut acrylic sheets of various thicknesses and shapes. Whether you’re using a hand saw, circular saw, or jigsaw, the key is to use a fine-toothed blade designed for cutting plastics and to cut slowly and steadily.
**General Sawing Tips:**
* **Blade Selection:** Choose a blade with a high tooth count (80 or more teeth for a circular saw) and a triple-chip grind (TCG) to minimize chipping and splintering.
* **Cutting Speed:** Cut slowly and steadily to avoid overheating and melting the acrylic.
* **Lubrication:** Use a lubricant, such as water or mineral oil, to reduce friction and prevent the blade from binding.
* **Support:** Support the acrylic sheet firmly to prevent it from vibrating.
### Routing
Routing is an excellent technique for creating smooth, precise edges on acrylic sheets. It’s also useful for creating grooves, rabbets, and other decorative features.
**Routing Best Practices:**
* **Bit Selection:** Use a spiral upcut bit designed for cutting plastics.
* **Router Speed:** Set the router speed to a medium setting to minimize heat buildup.
* **Multiple Passes:** Make multiple shallow passes instead of one deep pass to reduce the risk of chipping and cracking.
* **Template Use:** Use a template or guide to ensure accuracy.
### Laser Cutting
Laser cutting is the most precise and versatile technique for cutting acrylic. It uses a focused laser beam to cut the acrylic sheet with extreme accuracy and leaves a clean, smooth edge.
**Laser Cutting Considerations:**
* **Material Compatibility:** Ensure that the acrylic sheet is compatible with the laser cutter’s wavelength.
* **Power Settings:** Adjust the laser power and speed settings based on the thickness and type of acrylic.
* **Ventilation:** Ensure proper ventilation to remove fumes and debris.
By mastering these cutting techniques, you can confidently tackle any acrylic cutting project and achieve professional-looking results. This is a vital aspect of understanding the **best way to cut acrylic**.
## Preventing Cracking and Chipping When Cutting Acrylic
One of the biggest challenges when cutting acrylic is preventing cracking and chipping. Acrylic is a brittle material, and even small imperfections in the cutting process can lead to damage. Here are some essential tips and tricks to minimize the risk of cracking and chipping:
* **Use the Right Tools:** As mentioned earlier, using the correct tool for the job is crucial. Choose a tool specifically designed for cutting plastics and ensure that the blade is sharp and in good condition.
* **Cut Slowly and Steadily:** Avoid rushing the cutting process. Cutting too quickly can generate excessive heat and stress, leading to cracking and chipping.
* **Apply Gentle Pressure:** Apply gentle, even pressure to avoid overloading the acrylic sheet. Let the tool do the work, and avoid forcing it through the material.
* **Use a Lubricant:** A lubricant, such as water or mineral oil, can help reduce friction and heat buildup. Apply the lubricant to the blade or cutting edge before and during the cutting process.
* **Support the Acrylic Sheet:** Ensure that the acrylic sheet is well-supported to prevent it from vibrating or flexing during the cutting process. Use clamps or a vacuum table to secure the sheet to a flat surface.
* **Pre-Drill Holes:** If you need to drill holes in the acrylic sheet, pre-drill them before cutting. This will help prevent cracking around the edges of the holes.
* **Avoid Sharp Corners:** Sharp corners are stress concentrators and can increase the risk of cracking. Round off any sharp corners with a file or sandpaper.
* **Anneal the Acrylic:** Annealing is a heat treatment process that can help reduce internal stresses in the acrylic sheet. If you’re working with a particularly sensitive or stressed piece of acrylic, consider annealing it before cutting.
By following these tips, you can significantly reduce the risk of cracking and chipping and achieve cleaner, more precise cuts in acrylic. This is a critical skill in determining the **best way to cut acrylic** for your needs.
## Finishing and Polishing Acrylic Edges
Once you’ve cut the acrylic sheet to the desired shape, the next step is to finish and polish the edges. This will remove any rough spots, scratches, or imperfections and give the acrylic a professional-looking finish.
### Sanding
Sanding is the most common method for smoothing rough edges and removing scratches from acrylic. Start with a coarse-grit sandpaper (e.g., 220 grit) and gradually work your way up to finer grits (e.g., 400, 600, 800 grit). Use wet sanding techniques (i.e., using water as a lubricant) to reduce heat buildup and prevent the sandpaper from clogging.
### Filing
A file can be used to remove larger imperfections or to shape the edges of the acrylic sheet. Use a fine-toothed file and apply gentle, even pressure to avoid scratching the acrylic.
### Buffing
Buffing is the final step in the finishing process. It removes any remaining scratches and gives the acrylic a glossy, polished finish. Use a buffing wheel and a polishing compound specifically designed for plastics.
### Flame Polishing
Flame polishing is a technique that uses a controlled flame to melt the surface of the acrylic, creating a smooth, glossy finish. This technique requires practice and skill, as it’s easy to overheat and damage the acrylic. Use a propane torch with a small, focused flame and move it quickly and evenly across the edge of the acrylic.
### Chemical Polishing
Chemical polishing involves using a chemical solvent to dissolve the surface of the acrylic, creating a smooth, glossy finish. This technique is typically used for large-scale production runs and requires specialized equipment and expertise.
By following these finishing and polishing techniques, you can transform rough-cut acrylic edges into smooth, professional-looking surfaces. This final step is crucial for achieving the **best way to cut acrylic** and completing your project to a high standard.
## Safety Considerations When Cutting Acrylic
Cutting acrylic can be a safe and enjoyable process, but it’s essential to take the necessary safety precautions to protect yourself from potential hazards. Here are some important safety considerations to keep in mind:
* **Wear Safety Glasses:** Always wear safety glasses to protect your eyes from flying debris.
* **Wear a Dust Mask:** Acrylic dust can be irritating to the lungs. Wear a dust mask to prevent inhaling dust particles.
* **Work in a Well-Ventilated Area:** Ensure that you’re working in a well-ventilated area to prevent the buildup of fumes from cutting or polishing.
* **Use the Right Tools:** Using the correct tools for the job will help prevent accidents and injuries.
* **Follow Manufacturer’s Instructions:** Always follow the manufacturer’s instructions for operating power tools.
* **Be Aware of Fire Hazards:** Acrylic is flammable. Keep flammable materials away from heat sources and open flames.
* **Dispose of Waste Properly:** Dispose of acrylic scraps and dust properly to prevent environmental contamination.
By following these safety precautions, you can minimize the risk of accidents and injuries and enjoy a safe and productive acrylic cutting experience. Safety is always paramount, and should be factored into your understanding of the **best way to cut acrylic**.
## Choosing the Right Acrylic Cutting Service: A Professional’s Perspective
While this guide equips you with the knowledge to cut acrylic yourself, sometimes outsourcing to a professional acrylic cutting service is the **best way to cut acrylic**. Here’s a professional’s perspective on when and why you might choose this option:
**When to Consider a Professional Service:**
* **High Precision Requirements:** If your project demands extremely tight tolerances or intricate designs, a professional service with advanced equipment (like laser cutters) is often the most reliable choice.
* **Large-Scale Projects:** For large production runs, the efficiency and consistency of a professional service can save you significant time and resources.
* **Complex Shapes or Angles:** Cutting complex shapes or angles can be challenging, even with the right tools. Professionals have the expertise and equipment to handle these tasks with ease.
* **Material Waste Minimization:** Professional services often have sophisticated software and cutting techniques to minimize material waste, which can be a significant cost factor.
* **Finishing and Polishing Expertise:** Achieving a flawless finish requires specialized skills and equipment. Professional services can provide a range of finishing options, including polishing, edge rounding, and surface treatments.
**What to Look for in an Acrylic Cutting Service:**
* **Experience and Expertise:** Look for a service with a proven track record of cutting acrylic and a team of experienced professionals.
* **Equipment and Technology:** Ensure that the service has the necessary equipment and technology to meet your project requirements, including laser cutters, CNC routers, and polishing machines.
* **Material Options:** Choose a service that offers a wide range of acrylic materials in various thicknesses, colors, and finishes.
* **Quality Control:** Inquire about the service’s quality control procedures to ensure that your project meets your specifications.
* **Turnaround Time:** Discuss the project timeline and ensure that the service can meet your deadlines.
* **Pricing:** Obtain a detailed quote that includes all costs, including material, cutting, finishing, and shipping.
By carefully considering these factors, you can choose the right acrylic cutting service to meet your specific needs and ensure a successful project outcome. Even understanding when *not* to DIY contributes to finding the **best way to cut acrylic**.
## Q&A: Expert Answers to Your Acrylic Cutting Questions
Here are some insightful questions and expert answers to address common challenges and advanced queries related to cutting acrylic:
**Q1: What is the best blade for cutting acrylic with a circular saw?**
A1: The best blade is a triple-chip grind (TCG) blade with a high tooth count (80 or more teeth). This type of blade is specifically designed for cutting plastics and will minimize chipping and splintering. Ensure the blade is sharp and in good condition for optimal results.
**Q2: How can I prevent acrylic from melting when laser cutting?**
A2: To prevent melting, optimize your laser cutter settings. Reduce the laser power and increase the cutting speed. Also, ensure proper ventilation to remove heat and fumes. Consider using masking tape on the acrylic surface to protect it from heat damage.
**Q3: What’s the best way to remove scratches from acrylic edges after cutting?**
A3: Start with sanding using progressively finer grits of sandpaper (e.g., 220, 400, 600, 800 grit). Use wet sanding techniques to reduce heat buildup. Finish with buffing using a buffing wheel and a polishing compound specifically designed for plastics.
**Q4: Can I use a regular drill bit to drill holes in acrylic?**
A4: While you *can*, it’s not recommended. Regular drill bits can cause cracking and chipping. Use drill bits specifically designed for plastics, or modify a standard bit by grinding the tip to a shallower angle. Drill slowly and apply gentle pressure.
**Q5: What’s the difference between scoring acrylic with a knife and using a plastic cutter?**
A5: A scoring knife creates a shallow groove, while a plastic cutter creates a deeper, more defined groove. Plastic cutters are generally easier to use and produce cleaner breaks, especially for thicker acrylic sheets. However, both methods are suitable for thin acrylic.
**Q6: How do I cut a perfect circle in acrylic without a laser cutter?**
A6: Use a circle cutter attachment for your drill or router. This tool allows you to precisely cut circles of various sizes. Secure the acrylic sheet firmly and cut slowly and steadily to avoid chipping.
**Q7: What type of lubricant is best for cutting acrylic?**
A7: Water or mineral oil are both excellent lubricants for cutting acrylic. They help reduce friction and heat buildup, preventing the blade from binding and minimizing the risk of cracking.
**Q8: How do I anneal acrylic to relieve stress before cutting?**
A8: Annealing involves heating the acrylic sheet to a specific temperature (typically around 180°F or 82°C) and then slowly cooling it down. This process relieves internal stresses and makes the acrylic less prone to cracking. Consult a professional for specific annealing instructions based on the type and thickness of your acrylic.
**Q9: What is the ideal feed rate when using a CNC router to cut acrylic?**
A9: The ideal feed rate depends on several factors, including the type of acrylic, the thickness of the sheet, and the router bit being used. As a general guideline, start with a feed rate of around 30-50 inches per minute and adjust as needed. Monitor the cutting process closely for any signs of chipping or melting.
**Q10: Is it possible to cut acrylic underwater to reduce friction?**
A10: While theoretically possible, cutting acrylic underwater is not a common practice and requires specialized equipment and precautions. The benefits of reduced friction may be offset by the challenges of working underwater. Instead, focus on using appropriate lubricants and cutting techniques.
These answers provide deeper insight into the nuances of acrylic cutting and demonstrate a commitment to providing truly helpful information, furthering our goal of explaining the **best way to cut acrylic**.
## Conclusion: Mastering the Art of Acrylic Cutting
In conclusion, mastering the **best way to cut acrylic** requires a combination of knowledge, skill, and attention to detail. By understanding the properties of acrylic, choosing the right tools, mastering cutting techniques, and taking necessary safety precautions, you can achieve clean, precise cuts and create stunning acrylic projects.
Whether you’re a DIY enthusiast or a seasoned professional, the tips and techniques outlined in this guide will help you overcome common challenges and achieve professional-looking results. Remember to prioritize safety, take your time, and practice patience. With dedication and perseverance, you can master the art of acrylic cutting and unlock your creative potential.
Now that you’re equipped with the knowledge and skills to cut acrylic like a pro, we encourage you to put your newfound expertise to the test. Share your experiences, tips, and projects in the comments below. And if you’re looking for expert assistance with your next acrylic cutting project, don’t hesitate to contact our team of experienced professionals for a consultation.
Happy cutting!

